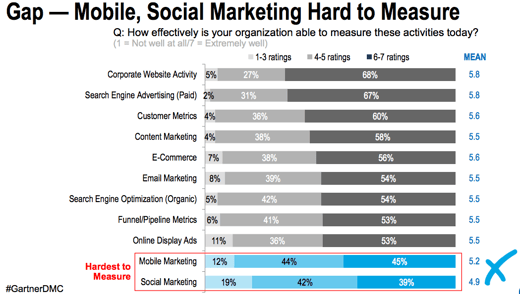
Social media analytics are hard. That's one of the biggest problems with social media. Anything that makes them easier is awesome.
Anyone that has spent professional, quality time with Radian6, Sysomos, Crimson Hexagon, or any other social analytics platform knows how difficult it can be to manage the large volumes of data they quickly produce. Dealing with this social media data can become overwhelming, especially if you have your own company design standards or reports you need to produce rather than screenshotting or exporting the pre-canned reports they provide.
Microsoft Excel is commonly used to manage the raw social metrics data these tools export. I've spent over 7 years managing social media analytics and creating social applications for dozens of clients and Excel has been a critical tool for that work. One of the reasons that Excel is so powerful is because of its support for VBA macros which allow you to create your own functions and customize how your data is handled. This capability is critical when it comes to social media metrics and analysis because macros can be used to manipulate data in any way you like.
In this series of posts, I'll give several ways to use Excel macros to improve your social media reporting workflows, giving you more time for community management (your favorite, I know!)
But first things first: you need a place you can store these macros so you can use them in your daily social analytics activities.
In this post, I'll show you how to create a Personal Macro Workbook in Excel for Windows. Why do you need one? You could simply use the Macro Recorder or VBA Editor in Excel to create one-off macros but it's much more manageable to store them in a spreadsheet known as a Personal Macro Workbook ("PMW" for short.) This allows you to easily share your macros between any open Excel workbook on which the PMW is stored. This is much easier than copying macros between every workbook in which you'd like to use them. You can also create an Excel AddIn so that you can easily share it between machines and other people. I'll show you how in a future post.
I'm going to focus on Microsoft Excel for Windows in this post because that's what most people use - if you need instructions for the Mac, check this link.
How To Create a Personal Macro Workbook in Excel
Step One: Make sure the Developer Tab is visible on the Excel Ribbon
In your running instance of Excel, click on File | Options | Customize Ribbon. On the right side of the window that pops up make sure "Main Tabs" is selected in the dropdown and check the box next to the "Developer" tab and click "OK":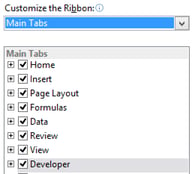
Step Two: Save the Personal Macro Workbook
We're going to use the Macro Recorder for this. Click on the Developer tab in the Ribbon then on "Record Macro." A dialog will appear asking you to name the macro and ask you where to save it. Choose "Personal Macro Workbook." Select a range of cells in the open Worksheet with your mouse (we're simply doing this to get some commands into the macro - what you do doesn't matter.) Then click "Stop Recording." Refer to the images below for help. Close and exit all instances of Excel.


Step Three: Make your Personal Macro Workbook Visible
Click "Yes" on the dialog that prompts you to save your changes to the Personal Macro Workbook. Excel creates the file for you if it does not exist! Pretty slick. Restart Excel. Your PMW will also open but Excel keeps it hidden - you need to fix that if you plan on adding new macros. On the View tab locate the Window tab group and click the "Unhide" button. The Unhide dialog will appear allowing you to select "Personal.xlsb." Click "OK" and you should now be able to see your Personal Macro Workbook!Step Four: Checking out Your First Macro
Once you've opened your PMW you can see the code Excel added to it when you created your first macro. Here's how:
- Click on the Developer Ribbon
- Click "Macros"
- The Macro dialog will appear. Make sure that you select "Personal.xlsb" in the "Macros in:" dropdown so you can see the specific one we've created for this post.
- Highlight "Macro1" in the macro list box
- Click the "Edit" button on the right side of the dialog box
- The code for the macro we recorded should pop up in the Visual Basic Editor in a separate window from Excel
- Feel free to delete the macro! We don't need it anymore - its sole purpose was to help Excel create the PMW for us.

Step Five: Details, Details
Where does your PMW live on your system? Typically it's automatically saved in your Windows user profile in the following location:
C:\Users\<username>\AppData\Roaming\Microsoft\Excel\XLSTART
Feel free to verify it. Go ahead, I'll wait.
This file will open every time you open Excel and its contents will be shared across all open Workbooks. Note that only one copy is editable. Excel will complain if you try to open it multiple times and make all but one copy read-only if you try.
It's technically not possible to share this file between computers but in a future post I'll explain how to get around that. You can easily share it with others via email - that is if your email server doesn't block a macro-enabled spreadsheet attachment like the plague it could be. SharePoint is another option. You can copy macros between workbooks easily using the Visual Basic Editor but you shouldn't need to do that except in rare circumstances.
Since the PMW will open every time you open Excel it may get in your way. If this is the case simply re-hide it using the same steps we covered in Step Three above; however, choose "Hide" instead of "Unhide." You can always change the PMW's visibility when you need to edit the macros or data it contains.
What You've Learned:
In creating your own Personal Macro Workbook, you've taken the first step toward creating a powerful social media toolkit that you can share between all the spreadsheets you come across. In my next post, I'll give you some basic macros to make your life easier when dealing with exported data from Radian6, one of the most popular social media monitoring solutions on the market today.
Microsoft has a great tutorial on how to create a PMW that you can refer to for more information.
If you have any questions don't hesitate to ask! Like our Thought Labs Facebook Page or ask me whatever you like on Twitter at @cappypopp.