
Don't worry, as long as you follow these steps, you won't end up this frustrated. Now put down the giant hammer and let's get started.
In our last post we talked about what LinkedIn conversion tracking is and how the LinkedIn tracking pixel works.
Now that you understand why you need the LinkedIn conversion tracking pixel to build more successful LinkedIn ad campaigns, it's time to dive into how to actually get it set up and running on your website.
How Can I Set Up LinkedIn Conversion Tracking?
There are two main parts to this process - adding the LinkedIn Insight Tag to your website, and creating Conversions".
Adding the LinkedIn Insight Tag
- Log into the LinkedIn campaign manager.
- If you manage multiple LinkedIn company pages select the page you want to set up conversion tracking for and click it.
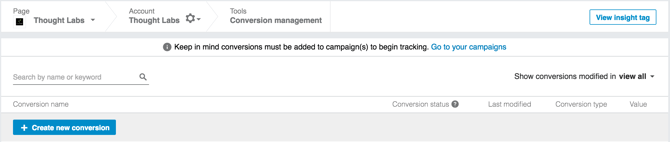
- This will take you to the campaign manager screen. Hover over "Tools" in the upper right corner and then click "Conversion Tracking."

- Enter the top-level domain address for the website you want to track conversions on. You don't have to include sub domains, protocol (http/https) or the host (www). For example, if we want to track conversion on our website, we would enter "thoughtlabs.com." Then click "Continue."
- At the next screen you'll be able to copy your LinkedIn Insight Tag code. LinkedIn recommends adding the code to every page on your website. You can do this in one easy step by adding the code to your website's global footer. If you don't want to add the code to every page on your website, at the very least you'll want to add it to your thank you pages and/or your purchase confirmation pages. If you do add the code to your global footer make sure you don't manually add the code to individual pages later, having duplicates of the tag on the same page will cause problems and is very likely to lead to inaccurate reporting. After you've finished adding the code to your website, click "Next" in the campaign manager.
If you've already setup Google Tag Manager for your website, you can also follow the steps in the first section at the following link to easily add the LinkedIn Insight Tag code to Google Tag Manager.
Creating LinkedIn Conversions
Adding conversions to the LinkedIn Campaign Manager is easy. You won't have to add any new code to your website, and the steps you take will be the same each time.
- Log into the LinkedIn campaign manager and go to the page you want to set up conversion tracking for.
- This will take you to the campaign manager screen. Hover over "Tools" in the upper right corner and then click "Conversion Tracking."
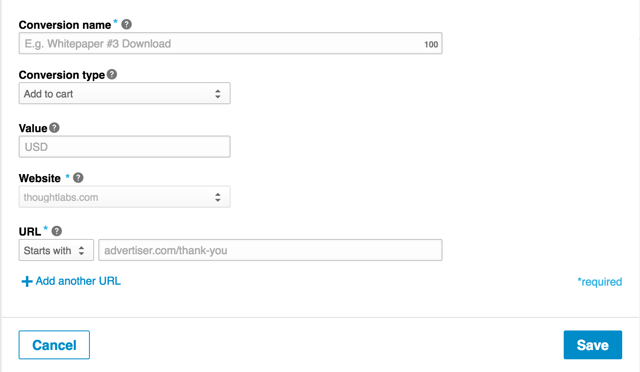
- Click the "Create new conversion" button.
- Fill in the values for your conversion, these are "name," "type," "value," and "URLs." For "Name" you can choose any name which will help you identify the conversion goal for this campaign. For "Conversion type" pick a type from the list that most accurately describes your conversion goal. "Value" is the dollar value you are assinging to each conversion. "Website" is the domain that your landing page is hosted on, and "URL" is the link to the landing page for this conversion. Once you've finished filling in these options, click "Save." Your conversion is now ready to be used in a future campaign!
What is Conversion Status?
Conversion status tells you whether your tag has been verified or not. Your tag will be "unverified" until someone visits the landing page URL that you added to your conversion options. Once that happens, as long as you set everything up correctly, your tag will fire and it will be "verified" by LinkedIn.

After that happens your conversion's status will change to "verified."
How Do I Actually Use My LinkedIn Conversion Tracking in an Ad Campaign?
- Log into the LinkedIn campaign manager and go to the page you want to set up conversion tracking for.
- Click "Create Campaign" in the upper right area of the screen to start building a new LinkedIn ad campaign. Choose from either a Sponsored Update or Text Ad campaign.

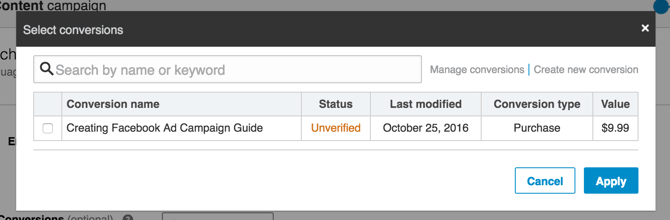
- Next you'll be given the option to name your campaign, choose a language, and also to add conversions.

- Click the "Select Conversion" button. You'll see a pop-up containing all of your available conversion events. Check the box to the left of the conversion you want to use for this campaign, and then click the "Apply" button.
- Continue building your ad campaign as you normally would. Once you're finished you'll be able to track conversions on your LinkedIn ads in this campaign!
Now you know how to set up the LinkedIn Insight Tag on your website and start tracking conversions on your own LinkedIn ads!